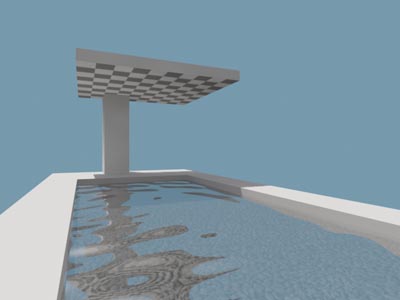
The following steps explains how to make water like the one shown in the sample image above. This method generally works with or without Radiosity rendering. The ripples are animatable, and made by bump map. The edge of the water is always kept straight despite the ripples.
If you want to see the file that created this sample image, you can download my demo file (3DS Max Design 2012) which includes a sample material for water with ripples. (Right click here, save the target file, and unzip the folder before loading the .max file to 3DS.) The file uses Radiosity for rendering. The name of my material for water is water_surf, which is applied to a single rectangle surface named water.
Step 01. Modeling boundary surfaces and camera
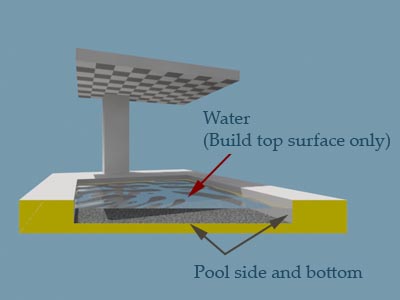
Model a pool including its bottom and side surfaces, and assign some material such as concrete for the sides and pebbles/tiles for the bottom. Also, make sure your camera is placed so that it sees a reflection of some objects on the water. It also is a good idea to place the camera at about eye-level (1.5 meter or 5 feet above ground). Without this set up, you will have difficulty in getting a good visual feed-back and control over the rest of the process.
Step 02. Modeling water surface
Model water object as a surface plane representing the top of water. Do not build your water object as a volume with its sides and bottom faces as they tend to flicker badly when your camera becomes animated. If you initially build a volume of water in Rhino/Autocad, you should explode it and remove its sides and bottom faces.Also, check the water surface has the right Normal direction.
Views > xView > Face Orientation: Turn this onIf your water surface has flipped Normal direction, it would look green when you select it and see it from above while this option is turned on. And the rendering will not show the flipped water surface at all. In this case, you need to flip the surface back in Rhino/Autocad, or you can apply Flip Normal modifier to the surface in Max.
  (select the fipped surface) > Modify button >
  > (Modifier List pull-down menu) > Choose Noraml
      Make sure Flip Normal option is on (default).
After checking, turn off the xView option for Face Orientation.
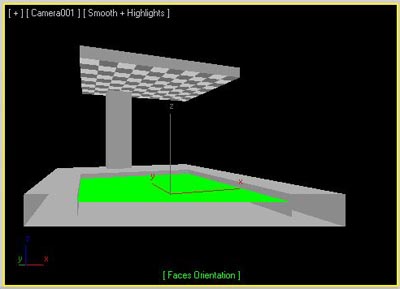 If the top side of the water surface is flipped,
it would show green when you select it while Face Orientation
option is on.
If the top side of the water surface is flipped,
it would show green when you select it while Face Orientation
option is on.
Step 03. Water material
Bring up Material editor, make a new entry as Raytrace material.(Material editor) > (select unused ball) > Material menu > Get Material > > Materials > Standard > RaytraceName it as water_surf, and assign it to your water object. Adjust the following parameters while keeping all others as default. Under Raytrace Basic Parameters tab for the water_surf material,
  Raytrace Basic Parameters for water_surf
  > Diffuse: Assign black color
  > Transparency: Uncheck and type # between 90-99
  > Reflect: Uncheck and type # between 30-60
  > 2-sided: keep this off. (Turning this option on
      with a flipped water surface would likely to
      produce incorrect refraction of water.)
 [top: reflection 60 + transparency 99]
 [bottom: reflection 30 + transparency 95]
Step 04. SuperSampling
For Radiosity, exclude water object from the Solution process. Water is very transparent, so we let Radiosity ignore its contribution to the diffuse environment. And this works faster.(Select water object) > Edit menu > Object Properties > Adv. Lighting tab > Geometric Properties > click ByLayer > turn on Exclude from Adv. LightingYou can now run the Radiosity.
Then, when you render an image, you need to turn on SuperSampling in order to remove artifacts in reflection and transparency. This will become very important when you later add ripples on the water. Without SuperSampling, you would get lots of flickering in camera animation.
  (Render Setup panel) > Renderer tab
  > Global SuperSampling
     > Disable All Samplers: turn this off
     > Enable Global Supersampler: turn this on
     > drop-down menu: choose Adaptive Halton
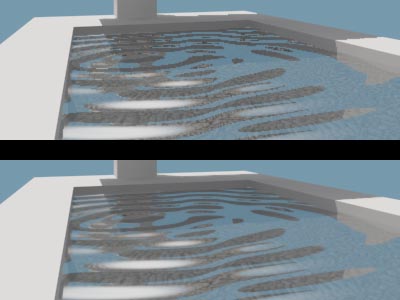 [top: SuperSampling off (visible pixelation and jaggy edges) ]
 [bottom: SuperSampling on (wave texture shows smooth) ]
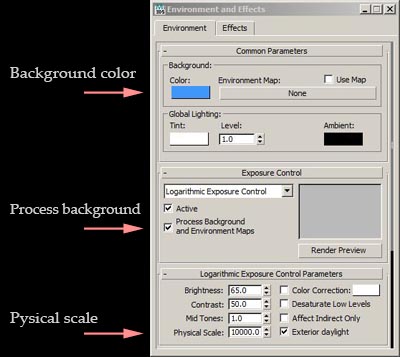
Step 05. Background
If your water is outside, it is likely to reflect background, so it is a good idea to set its color. Your camera may be looking down on the water without directly seeing any part of the sky, but the sky may show in the reflection on the water. Therefore, the default black background is not likely to work well.Rendering > Environment > Background > ColorIf you are using Radiosity, you need another step. The brightness of reflection of background in water needs to be adjusted manually, since it is not specified with a physically measured luminance.
  Rendering > Environment
  > Logarithmic Exp. Control Parameters
  > Physical Scale: adjust value
Increasing this Physical Scale value increases the contribution of the color of the background reflected on the water surface. Default is 1500. Using a small value will reduce the effect of the background in the reflection as if the environment is very dark.
Also, by default, changing this Physical Scale value has no effect on the background color itself. It only affects its reflection. However, if you turn on the following option, the background color itself gets adjusted to the Exposure of the scene. You may or may not like to use this option in different situations.
  Rendering > Environment
  > Exposure Control > Process Background
      Turn this on to scale background color
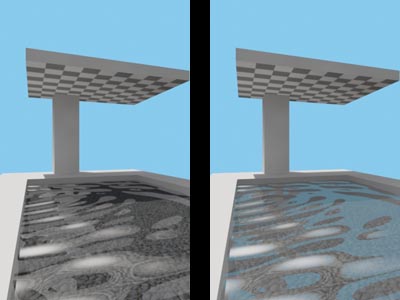 [left: Physical Scale = 150 (blue sky not obvious in reflection)]
[right: Physical Scale = 15000 (blue sky contributes to reflection)]
Step 06. Ripples
For a pool inside, calm water looks good as is. For an exterior water, you may add ripples as well. 3DS can make a realistic ripples of different sizes, but I caution you that overdoing the ripples could destroy your spatial representation by putting too much emphasis on eye-catching water surface. Especially in animation, a slight ripple will look very dramatic with camera movement, so keep the height of the ripples conservative. To do so, you can use a small Amplitude value for Waves map.To add ripples to water_surf material, we apply Waves, which is a pre-defined procedural map, as bump map. If your version of 3DS does not have this Waves map, an alternative is to use the procedural map, Noise. This one can make a pretty good emulation of ripples, but the advantage of using Waves is that you can also animate the ripples easily.
To see the ripples of the water, your camera needs to see something that the water surface reflects. Without reflection, you will not see the ripples on the water surface well, and have difficulty controlling parameters.
To begin, go back to Material editor, and select water_surf material for editing. Then apply Waves as Bump map.
  Material Editor > (select water_surf material)
  > Raytrace Basic Parameters > Bump > click None
  > (Material/Map Browser) > Maps > Standard
  > Waves
You are now in Waves map editor. If you render with all defaults, depending on the unit of your model and the size of the water surface, the ripples may look OK in the first shot or may not appear because it is too large or too small. You can then adjust the ripple parameters.
The following describes a method to adjust Waves parameters to a decent ripple, and is based on my experimentation. For more details, look into the 3DS Max on-line help.
For a simple setup, We try NOT to assign any UVW Map (gizmo) to water surface object. If you modeled the water surface object in Rhino/Autocad and did not scale/rotate it in Max, you are most likely to be OK with the default mapping coordinates, which is set to Object XYZ.
  Waves editor > Coordinates
  > Source: Keep Object XYZ (or switch to World XYZ)
     Choose Explicit Map Channel if you use UVW Map

     xyz offset values should be 0.0
     Tiling values should be 1.0
On the other hand, if you have scaled your water surface object
in Max or modeled and edited it in Max, you may have difficulty
adjusting the Waves parameter later. In that case, try
switching to World XYZ option as below. This would
reset the interpretation of Wave parameters by ignoring the
scaling factor of the water surface object, but the centers of
the rings of waves locate near world coordinate origin, which may
be far away from your water. (Waves appear as series of rings starting from a number of centers. These centers are likely to occur near the coordinate origin. If you want to manually shift this origin relative to your object, you can use Explicit Map Channel option instead, assign UVW Map to water surface object with Planar Mapping option, turn off its Real-world Map Size option, and assign 1 for its Length and Width. You can then move UVW Map's gizmo to reposition the coordinate origin.)
Next, start with the following values which should be very close to the default ones. The values differ according to the System Unit setting of your 3DS Max file.
  Waves editor > Waves Parameters
       [your unit] meter centimeter inch  feet
    Num Wave Sets:    3        3     3       3
    Wave Radius:     15     1500   600      50
    Wave Len Max:     1      100    40       3
    Wave Len Min:     1      100    40       3
    Amplitude: (Start with 2 and decrease to <1)
    Phase:            0        0     0       0
Now, render an image, and adjust parameters further. The
tips for your adjustment process follow.
Amplitude
Amplitude scales the height of the waves. Normally, for architectural water, you need a value equal to or smaller than 1. However, it is useful to temporarily boost this value to 2 or higher and make ripples very visible while you are adjusting other parameters. Once other parameters are set, reduce this value back down and calm the ripples to a more conservative expression. My advice is to always use only sublte waves in architectural animations.Wave Len Max/Min
Wave Len Max and Min are intervals between ripples. For usual exterior landscaping pool of water, 1 meter (3 ft) is ok. For instance, the pool in the sample file is approximately 6x12 meters, and 1 meter interval would make a good number of ripples in there. However, if your water is on a small fountain of sides less than 1 meter, you would obviously like to use much smaller interval value. Conversely, for ocean, large interval value may make more sense. Keep Max and Min values to be the same or close.Wave Radius
Wave Radius controls roundness of each wave's ridge. Imagine the vertical section of a series of waves. A smaller Radius value of each ridge makes spikes of well articulated waves and a larger value makes more rounded, soft waves on water. Decent range for changing this value is listed below.
               meter centimeter  inch  feet
  Wave Radius: 2-50  200-5000  80-2000 6-150
The Wave Radius value should be considered relative
to wave interval (Wave Len Max/Min). If the interval
between waves is large, the radius of each wave shape
probably is large. The recommended values listed
above assumes you are using the Wave Len Max/Min
values as described in the table above.
If you change the Wave Len Max/Min, I suggest you to
proportionally change the Wave Radius as well.
Generally, Wave Radius needs not be smaller than
the Wave Len Max/Min values.
Phase
Keep this 0 unless you are animating waves. (See the next section for details.)
 [top: Amplitude 10 (too high)]
[middle: Amplitude 2 (very stormy)]
[bottom: Amplitude 0.4 (calm water)]
 [top: Wave Radius 50m (well rounded waves)]
[middle: Wave Radius 10m]
[bottom: Wave Radius 1m (spikes of waves)]
Step 07. Animating waves with Phase
When the camera is moving, static ripples usually is OK since it is hard to tell if the ripples are moving or not. But when the camera is still, frozen ripples may look strange like a piece of wax and you probably prefer moving ripples.To animate the ripples, assign animation to Phase value. Its speed of change should be experimented by yourself. As an example, my previous projects use a speed at which Phase value increments by 1 for every 3 seconds. For instance, you can set Phase value 0 at frame 0, and set Phase value to 1 at frame 90 if your animation is 3 second long and has 30 frames per second.
You can do this by using Auto Key button and Time Slider bar at the bottom of Max screen just like the way you assign animation to camera positions with key-framing method. Turn Auto Key on, move the Time Slider to the target frame, set the appropriate Phase value, then Turn off Auto Key. Moving Time Slider will show the Phase value changing through interporation. When animation is assigned, Phase value's arrow markers show with red frame. Be careful not to accidentally assign animation to other parameters.
To check how the Phase value is changing, open up Track View by the method described below. The graph should show a curve with two endpoints. If it has more than two points, remove the ones in the middle. Also, by default, the value changes with Slow-in and Slow-out option making a tangential curve at each end. You need to change this to a linear graph so that the value changes at a constant speed.
  (Put the cursor in Phase value box)
  > (right-click and select Show in Track View)
  > (right-click each endpoint of the curving graph)
  > (assign linear setting for IN: and Out: speed)
Once animated, rippleslook much more obvious than in a still frame. For usual architectural animation, I strongly suggest you calm down the waves by decreasing the Amplitude value to a much smaller value below 1.

Movie: Phase 0 at frame 0 and 2 at frame 200 (30 fps)